

This Witch costume is so easy to make it only takes a half hour at the most. Here is what you will need...
Supplies-
 black material
black thread
scissors
Directions-
To find out how much material you will need measure the person from the top of their shoulders to the ground. Then double that number and add a few inches.
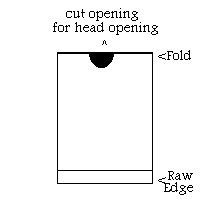
Take the material and fold it in half . In the middle of the fold cut a half circle. This is to make a head opening to allow you to put the material over your witches head.
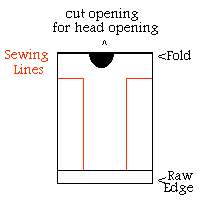
Once you have the hole cut out for the head it is time to sew the sides and arms. See the picture below, you are going to sew where you see the red lines. When you have finished sewing, your witch should be able to put the costume on.
Now you can cut from the bottom up to under the arms in thin strips. Make sure you leave a inch of material from the seam to the first cut, just so it stays sewn together. This gives your witch black pieces of material hanging in tattered stips from their arms.
Details-
Now just cut off one of those strips hanging down and use it to tie the gown around the waist.
Mess up your withces hair and use some hair spray to keep it standing up in the air.
Take some of your makeup and give your witch nice dark circles under the eyes, and some nice black lips.
Notes-
If your victim would rather be a devil than a witch just use red material. A red satiny material works good when you cut the side strips so it flickers like flames.
Now if your witch is older you can buy the material a few feet longer than you need and fold the material so that the long end drags in the back. Cut it in strips and your older witch can drag around a tattered train behind her.
Your little one wants to be something a little nicer than use light blue or white material and make your child into a Angel! Don't we all wish it was that easy!
And the last idea for changing this simple costume around is a little harder, but makes for a great effect. Instead of cutting the sides in strips you can cut out a spider web...
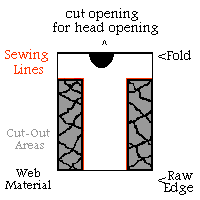
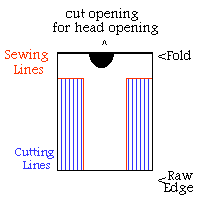
Once the sewing and the neck is done draw a thick lined web on the material at the sides. This web is shown as black lines on the drawing. Now cut out the areas inbetween the web, shown in the drawing as the grey areas. Make sure you leave material around the edges and near the sewn seams for support. Now When your Spider Queen raises her arms her web will show.
Now that you have seen how easy it is to do, you can adapt this to many different costumes. If you come up with a idea please let me know. I will add it to this page and give you credit!!

 Halloween Page